Wednesday, December 22, 2010

I'm Baaaaaaaaack!

Dear readers (if I have any),
Please excuse my absence! Regularly scheduled programming should resume shortly! Until then, please accept this pretty picture as my sincere apology.

Love,
Adara

Tuesday, July 13, 2010

Too Faced Tuesday


                                                (Oh hello my other idol, Katy Perry. 'Sup?)


Well it seems I'm doing rhyming weekday posts as of late so I might as well stick with it. Too Faced is a cosmetics line carried in most beauty stores. Their products sort of combine and old-Hollywood vibe and a modern-model look. Needless to say, I love it. (I have a fantasy of time travelling back to the 50's because I love the style soooo much!) Anyways, the Too Faced section on Sephora.com is great, and even gives little tutorials on how to get the looks of some of the models shown. I loooove it!!!

Also, I love having a cute vintage-y makeup set up on my vanity, so the packing for their products just makes me all happy and bubbly every time I see it!!! <3

So let's put aside my love for Too Faced for one teeny second and get down to business, tutorial style!

(Ok soooo... it's still gonna be all about Too Faced but I promise not to use as many exclamation marks and <3's, ok?)

Vintage Inspired Look:
I am not ashamed to admit I LOVE DITA VON TEESE. She is gorgeous and classy and pulls off the vintage look so well!
This look I love especially! Red lips, cat eyes, and beautiful pale skin! As a skim-milk-pale girl myself, I really appreciate a woman who flaunts her pasty-ness instead of covering it up with a spray tan! For this look I recommend using the following products---

-Benefit Cosmetics Boi-ing under-eye concealer
-Too Faced Primed & Poreless Powder (this is a pretty matte look)
-Any liquid foundation (whatever works for you, but I like Covergirl Clean Foundation)
-Too Faced Borderline Smoothing Anti-Feathering Pencil (red lipstick is very pretty, but not when it gets outside the lines...)
-Too Faced Lip of Luxury in Drop Dead Red (if you have a cool skin tone) or Runway Red (if you have a warm skin tone)
-Your favorite black pencil liner (mine is Urban Decay 24/7 Glide-On Eye Pencil in Zero)
-Any matte black eyeshadow you like

1. Apply your concealer to all the areas you need it. Usually the sides of the nose, under the eyes, and red spots, etc. Remember this look is all about perfect, matte looking skin. Also apply all over lids.

2. Apply your liquid foundation with your fingers. The warmth from your hand makes it apply more smoothly and cover more equally.

3. Swipe the Too Faced Primed & Poreless Powder all over T-Zone (forehead, nose, chin) and cheeks. Moisturize any dry areas beforehand so you don't end up flakey by the end of the day.

4. Line the outer edge of lips with the non-feathering pencil. Also rim the outside of lips just in case your lipstick breaks through the first barrier. Don't apply your lipstick just yet though.

5. Line your eyes just on top, and wedge your liner into your lashes as much as possible. Don't worry about smudges.

6. Using a wet makeup sponge, apply the black eyeshadow on lid and sweep out into a subdued cat-eye. Blend thoroughly up to crease.

7. Appli your lipstick with a lipstick brush--never straight from the tube. Make sure edges are straight and not out of line.

8. Enjoy your beautiful vintage look!


Monday, July 12, 2010

Mundane Monday (Not So Much!)

Helloooooo world! Today is MONDAY! But don't let that get you down! Whether you are going to work, or school, or nowhere at all, make your day a GREAT DAY! Take your Monday blues and make something out of it! Turn a boring day into a fabulous one! Wear bright colors, sing a little song! Today is Monday and you should enjoy it as much as any of the other days of the week!

Monday Blues!
Kick it up a notch at the office today! Wear false eyelashes, or try a new lipstick! Or try this look and kick the Monday blues out with some blue eyeshadow:

1. Rim eyes with creamy black liner (try Stila Smudge Pot in Black, or if you are feeling extra daring, try it in Black Cat, a shimmering black).

2. Take an aqua colored eyeshadow (I like SEPHORA COLLECTION Colorful Duo Eyeshadow in Tropical Blue, and you can even mix the two colors for a pretty green/blue) and rim eyes again. Cover entire lid up to the crease and sweep down under eyes right on lash line)

3. Using a shimmery light blue, sweep lightly across brow bone and blend with lid color to crease. LORAC Starry-Eyed Baked Eyeshadow Trio looks great in Rockstar for this look.

For the rest of this look, go with neutrals because the eyes are the focus. A nude/shimmery light pink lipstick or gloss would go great, and a nude/bronzy sheen on cheekbones will complete this Monday blues look!

Perfect Lashes:


1. Start with clean eyes. Any leftover oily makeup remover is going to cause your mascara to slide right off. I loooooove my makeup remover, Neutrogena Fresh Foaming Cleanser. It's a makeup remover and a facial cleanser all in one! I love how fresh and clean my skin feels afterward, and it gets rid of my waterproof liner and mascara!

2. Use false lashes! They are easy to apply, last all day, and give volume and length. I love ARDELL LASHES 110 Demi Black.

3. Use the blackest of black mascara that you can find! Dior DiorShow Mascara is perfect for your new dramatic lashes!

4. Liner always makes lashes look thicker, so choose your favorite liner, and line away!

5. Make a perfect transition from day to night by adding smoky eyeshadow to your dramatic lashes!


However you spend your Monday, remember that you can make every day a great day, and just enjoy it!

Wednesday, July 7, 2010

Beat the Heat!

Everyone has a product they can't live without--I happen to have quite a few. Because I live in Georgia, the extreme heat and humidity can ruin every good hair day, and melt down any trace of makeup, so I always keep a few key items with me whenever I go out.


Before I leave the house:

Living Proof Leave-In Conditioner
The more moisture your hair has, the less it will absorb from the air (humidity ack!), so this leave in conditioner is great! Frizz free, soft hair is always a plus!

Benefit Cosmetics Stay Don't Stray
There is so much I love about Benefit Cosmetics! So where to start? Well besides the cute packaging that every product comes in, this makeup line is high quality. Benefit Cosmetics always exceeds my expectations! This primer works double time, keeping under-eye concealer crease-less and eyeshadow/liner in place! You're makeup won't even think about melting away when Stay Don't Stray is on your lids!


In my purse:


Bare Essentials SPF 30 Natural Sunscreen
This portable sunscreen is the best! It is applied with it's own attatched brush, and since it is in a mineral powder form, it can easily be applied over makeup if you're feeling a little pink on a day out!

Sephora Collection Thick Braidle Headband
When the heat and humidity gets the best of you, don't panic! This cute faux-braid headband keeps the hair off your face, and creates cute 'do's no matter what the occasion. Leave your hair down and slide it it, pull hair up in a bun and create a cute updo, or make a fun and flirty ponytail.


Anywhere:


Sonia Kashuk Blotting Papers (100ct)
These are, simply put, the best. Gets rid of shine. Takes less than 30 seconds. Doesn't block pores. Just absorbs oil. Buy it. Use it. Love it. They're addicting.

NARS Multiple Tint
I really can't seem to find a shade that I don't like in any of the NARS Multiple cosmetics. This product is the best of both worlds. It is a NARS Multiple product, but it is a tint! Makeup that stays put all day! It currenlty comes in two shades, Beverly Hills, and Turks and Caicos. Both are lovely, glowy shades that will give you a great silky sheen, but won't rub off too easily.


The best tip that I can give you though, is drink lots of water!!!

So remember, stay cool, stay hydrated, and HAVE FUN this summer!!!

Tuesday, July 6, 2010

Summer Glow


Everybody likes a good glow in the summer. The dilemma everyone faces is how to get that gorgeous summer glow. You could bake yourself a blistery bronze, or you could spray on that brassy brown. That's all the choices you have, right? Wrong. A perfect summer glow is achieved by many different methods. The most important thing to remember is that you skin is your greatest asset, so be nice to it! Sure, a baked bronze looks nice when you're young and at the beach, but what about later? Is that glow really worth it when you look 10 years older than you really are? Or how about when you get skin cancer? Not a pretty sight to see.

too-tan-3


Fortunately, it has become increasingly easy to get the best of both worlds! Try a moisturizing lotion and mix in a bit of your favorite bronzer, or even a dab of self-tanning spray/lotion/cream. Or, buy a lotion that already has a bit of self-tanner in it. My favorite is Jergens Natural Glow Daily Moisturizer. It even comes in a "firming" formula, which knocks out two birds with one stone if you're trying to get "bikini ready"!


When it comes to self-tanning there are three imporant things to remember:

1) EXFOLIATE

2) Always use something with SPF, even if you're only going to be outside for a little while (you'll thank me in 20 or 30 years when "Where Are They Now" comes out with a Jersey Shore edition)

3) followthedirections
followthedirections
followthedirections
followthedirections
followthedirections
followthedirections
followthedirections
followthedirections

I can't say this enough. If the self-tanner says apply sparingly around knees and knuckles, apply sparingly!
If the self tanner says wash hands after application, wash hands!
The directions are there for a reason (so you don't end up splotchy/orange/streaky), and if you follow these three golden rules, you will end up with a beautiful, sun-kissed look!

Thursday, March 4, 2010

Bright Eyes

Lately I've seen a lot of bright, and even neon eye colors out there. While I don't necessarily support neon yellow eyeshadow, I do like the trend. I also think there is a better way to do it than slathering on your brightest Urban Decay Cream-Shadow and calling it a day.

Sunset eyes, and mermaid eyes are both a fun look that anyone can get away with.

Sunset Eyes


Sunset eyes can be achieved in just four steps.

1. Apply a golden or peach eyeshadow to the lid, and sweep up to the crease. Follow around the eye and under your bottom lash line. I like Urban Decay Eyeshadow in Eldorado or Rush.

2. Use a deeper peach, or salmon colored shadow above the crease, making sure that you blend between the two shadows. I think the best color for this one is SEPHORA COLLECTION Colorful Mono Eyeshadow, in Lucky Penny 54, or Geisha Kiss 80.

3. Using the same golden or peach eyeshadow you used in the first step, apply above your "salmon" or "deep peach" color. Sweep up to the brow bone and apply a pearl colored shimmer to the top of your brow for a highlighted look. Glittering Sand 9, or Californian Blonde 10 from the SEPHORA COLLECTION Colorful Mono Eyeshadow work great for the pearl shimmer.

4. Apply a black pencil eyeliner to your bottom waterline, and rim the top of your eyes, as close to the lash line as possible, and as thin as possible. Apply a thickening mascara, and enjoy your gorgeous eyes! Makeup For Ever's Kohl Pencil in Black 01 works fantastic as your liner for this look.

Mermaid Eyes
(this picture is from Ashley is Boss's makeup blog, I do not own it, I did not take it, I just admired it)


Mermaid eyes are slightly more difficult than Sunset Eyes. The colors are darker, and the placement is different, but if you follow these steps it should be as easy as 1, 2, 3!

1. Apply a pearlescent green eyeshadow over your entire lid, up to the crease.
Tarina Tarantino Eye Dream Hypershadow in Sweetzer is perfect for this one!

2. Using a shimmering navy/medium blue, sweep from the outer corner of lid, making a small winged shape. Blend a little around the edges and between the two colors. SEPHORA COLLECTION Colorful Mono Eyeshadow in Dreamy Blue looks, well, dreamy with this mermaid look.

3. Apply a medium purple or dark lilac eyeliner below your bottom lashes, and on your waterline. Follow with a similar colored shadow on top of your eyeliner to give it a little extra staying power and a lot of extra "pop". Smashbox Cream Eyeliner in Midnight Purple goes perfectly with Illamasqua Powder Eyeshadow in Sadist.

Friday, February 26, 2010

Cheetalicious!

Alright so lately I've been wearing a lot of cheetah print. My Coach purse is gray cheetah, the shirt I wore yesterday was pink cheetah, the cardigan I wore last week is blue cheetah, obviously, I have a cheetah obsession. Now this may be going a bit above and beyond, but when one of my friends started playing around with this look, I was completely inspired to try it on my own! What is it? Cheetah print eyeshadow! Ok so I know its kind of overwhelming for an everyday look, but how fun would this be for a night out or a cool party?

You can use any colors to create this look, and it is surprisingly easy to do!

1. Apply any colors eyeshadow on lid, crease, and brow bone. Velvet-y looking eye shadows will work best, but shimmer ones look ok too. Use any technique you want, and feel free to use colors you wouldn't normally use for an every day look.

2. Sweep a black or dark brown liquid eyeliner across your lash line, and be a little more dramatic than you usually would. Wing out the ends, and on the bottom lid, sweep a little further in than you usually would, right to the edge of your tear duct.

3. Using a different colored eyeliner from the one you used before (and in pencil form), create small little "blobs" underneath your brow bone, not too far inwards.

4. Outline the "blobs" with a liquid eyeliner in crooked little half moons, and don't worry about being a little messy, this is not a "clean" look.

5. Enjoy looking fierce on your night out. Below are some products I recommend for this look.


Eyeshadow:
Benefit Cosmetics Velvet Eyeshadow
I particularly like Dandy Brandy, Nice Melons, and Leggy for this look!

Liquid Eyeliner:
Layer "Midnight Cowboy" over a black or brown Stila Smudge Pot for a glittery, glamorous look!

Pencil Liner:
Any pencil liner will do, but I love the way that Urban Decay's 24/7 pencil glides on creamy and stays on all day.

*A note to end on---Don't forget to prime your lids, or else your cheetah print might smudge right off! I love Urban Decay Eyeshadow Primer Potion!

Thursday, February 25, 2010

Rosy Cheeks...


Everybody loves a good blush. The right pink will make you look younger. The perfect rose will give you a sexy edge. A good peach creates an innocent look. But which blushes work? Let's take a look at a few different types of blush.

Powder Blush

Benefit's Dallas Blush is one of the best powder blushes I've ever used. The color is a dusty rose, but has a little bit of bronzer in it. I love the rectangular little brush it comes with. Use it at an angle and sweep from the apple of your cheek towards the ear for a romantic glow.

Cream Blush

Nars The Multiple in Orgasm is a gorgeous peachy pink shimmer that does three jobs in one; sculpts, highlights, and shades. Apply with fingers for a pretty glow, or apply directly with makeup stick and blend for a deeper color.

Cheek Stain

Not only is Benefit's Posietint a beautiful pink shade, but it works double-time, acting as both a lip and cheek color. The key to using a liquid formula is to moisturize beforehand, and apply quickly with fingertips, blending carefully. Start at the apples of your cheek and sweep towards ear. To use as a lip color, dot on lips and blend with fingers.

Wednesday, February 24, 2010

3 Steps to Smoky Perfection:

Everybody wants the perfect smoky eye, but nobody wants to spend twenty minutes doing it, so here is a quick, easy way to get a perfect smoky eye:


Step 1- Lining
Run a creamy black pencil around the inner rim of your eyes. Wedge into upper and lower lashes, and don't be afraid to get messy--you're just going to blend it out anyways.

Step 2- Blending
Use your finger or a makeup sponge to gently blend outward.

Step 3- Shadow
Smudge black eyeshadow from the eyeliner to your crease. Use a shimmery gray shadow to sweep on crease and extend a little beyond. The more you blend, the better!

Products to Use:

Creamy Eyeliner-Urban Decay Ink for Eyes is extremely blendable, glides on smoothly, and stays on all day. I like the shade "Zero". I swear it is one of the blackest blacks I've ever used.

Smoky Shadow- Shimmer Smudge Pots are great if you can handle a cream eyeshadow. The shades "Black" and "Black Cat" would be perfect for this look, but if you don't think you can use a cream shadow, stick with the Sephora Collection Colorful Mono Eyeshadow. The shades "Must Have", a matte black, and "Black Flame", a shimmery gray, are great for doing a smoky eye.

Tuesday, February 23, 2010

My Favorite Hair Stuff!

I don't know about you, but sometimes I have those days where my hair just won't work with me. It seems like I'm battling a frizzy, limp, static covered monster every other day. Those are the days when I root around under the bathroom sink and in my makeup drawers to try and find some magical product that will transform my hair into some silky semblance of pretty. Over the years I've found just the products that do that:

FX Special Effects Silk Drops-

I don't think I've ever used a more amazing product in my life. Since I live in Georgia, the humidity is constantly wreaking havoc on my easily frizzable hair. I've found that using this product keeps my hair tame enough to manage on even the steamiest days. I use 3 or 4 drops of this stuff on the ends of my towel dried hair after I get out of the shower, and then 1 or 2 drops after blow drying and styling my hair.

Directions:
Just drip a few drops on your hand, rub your palms together for a few seconds, then smooth on the ends of your hair.


Pantene Pro-V Extra Straight Shampoo & Conditioner-

I've heard the rumors about Pantene being bad for your hair, and to my relief, after a little research I've found out that it's simply not true. Pantene Pro-V are some of the best hair products out there. The shampoo is one of the most moisturizing ones I've ever used, and doesn't weigh my hair down at all, which is easy to do since my hair is so thick. The conditioner always keeps my hair feeling soft and looking shiny, especially if I rinse it out with cold water. Pantene Pro-V Extra Straight Shampoo & Conditioner is something I can always count on to keep my hair looking great.

Garnier Fructis Style Sleek & Shine Hairspray-


I hate hairspray. It makes your hair feel crusty and sticky and stiff, and I avoid it like the black plague. However, I have to say Garnier Fructis' hairspray really isn't that bad. I use it on my extra frizzy days when nothing else will do. I style my hair as usual (air dry, then straighten), then spray on a sparse amount of this stuff. The trick to keeping hair from feeling stiff is to brush it through the hair before it dries completely. Comb and repeat until hair no longer looks like a poodle.


Alright so those are a few of my must have products, good luck , and happy hair days!

Some looks I'm loving today!

Today I stayed home waiting for UPS to deliver my replacement iPhone, so obviously I had a lot of extra time on my hands. And obviously I spent the entire time online looking at makeup and such. I found a few looks that I really liked:


Classic red lips, with sophisticated eyes:

This look is an easy one to do, and even easier to pull off, especially if you need to look sophisticated for a night out.

1. Apply primer, concealer, and foundation as usual.

2. Dab concealer around the edge of your lips to keep your lipstick in place.

3. Lightly powder entire face with a dense brush to keep shine away (we're going for a matte look here). I recommend Sephora Mattifying Compact Foundation.

4. Using a black liquid eyeliner, line the top eye as close to the lash line as possible. Keep the line relatively thin, as the eyes are not the focus for this look. Wait a few seconds for the liner to dry, the take a stiff angled eyeliner brush and use it to apply matte black shadow directly on top of the liquid liner. Use the brush to fill in any spots the liquid liner couldn't get near the lash line. Next, curl your eyelashes, and apply a black mascara.

5. Find the right red lipstick shade for you. The rule of thumb is to follow the undertones of your skin. If you have peachy/golden undertones, go for an orange based red, like Kat Von D's Painted Love Lipstick in Stiletto. If you have rosy undertones, or pale skin, opt for a pink based red, or a red with blue undertones, like Clinique High Impact Lip Colour in Red-y To Wear.

6. For extra protection from lip color bleeding, line your lips beforehand with a nude color lip liner or a lip liner that matches your lipstick shade.
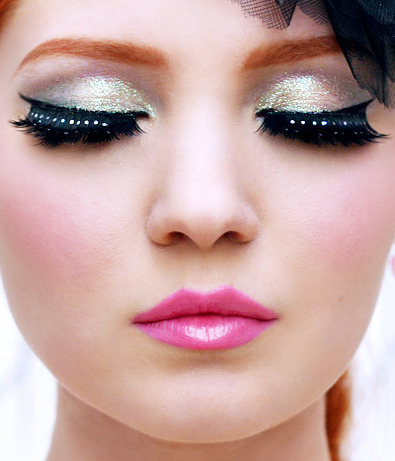
Golden Eye:


I love this glow-y bronzed look. Not sure who it is, but I came across the picture while on a Google adventure.

1. Apply your usual face makeup, i.e.: primer, concealer, foundation, etc.

2. Use a large blush brush or blending brush, and buff on some bronzing powder. Apply to cheeks, chin, and forehead (basically wherever the sun would naturally hit) in a sweeping manner. Blending is crucial, especially if you want it to look natural.

3. Using an eyeshadow brush (almost any one will do) apply a peachy bronze eyeshadow to the outer edge of your crease, and extend a little bit below, underneath the lower lash line. Next, use a shimmery golden eyeshadow across the entire lid. Sweep the shadow all the way to the tear duct, and follow underneath the lower lash line until you reach the peachy bronze shadow.

4. Make sure to either wipe off the brushes in between color changes, or use different brushes altogether. Next, use a shimmery bronze (no peach, just brownie colored with a little shimmer) to apply to the inner area of the crease.

5. Now that we are done with the shadow, use a dark brown or black liquid eyeliner to line the eye. Start with a very thin line extending from the tear duct, to the other end of the eye, gradually getting thicker. An easy way to get the line thicker as you go along is to just follow your lash line and gradually pull away from it, then fill in the empty space later. (here is a great 3 minute video tutorial on applying liquid eyeliner!)


6. Use the same liquid eyeliner for the bottom, but instead of following the lash line, line the water-line. Finish the look with a fabulous thickening mascara, like Covergirl LashBlast Mascara.

Monday, February 22, 2010

My First Post!

Hi! Welcome to my beauty blog, pretty in pink lipstick! My name is Adara, and I'm 17 years old living in Georgia. I love any and all things beauty, and could play in makeup for days on end. Recently I started getting serious about finding a career in the beauty industry, and I've decided to start a blog to see if I've got what it takes. Anyways, I'm pretty new to the blogging scene, but I'm sure it can't be that hard. I'd like to do makeup tutorial videos and blog about makeup and post pictures of the makeup ideas I have. So, follow closely, send me feedback, and maybe we can all learn something! Enjoy!